
I’m so excited to be a part of this awesome series presented by Sugar Bee Crafts!! There are so many fabulous projects that will be hosted here and I seriously urge you to check back daily (and catch up on already featured projects) to make sure you don’t miss out on the Patriotic posts that have been featured!

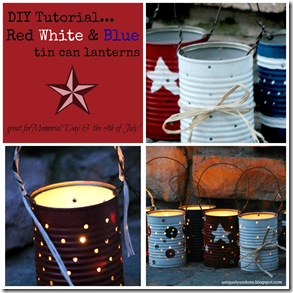
I've recently switched my dog over to a wet food diet since he had 22 teeth pulled (yes, 22! I never knew just how many teeth dogs do have!!) Since then, my recycling bins have become overflowing with cans - which my son then decides he can use them for his digging excursions. Being a bit wary of him using them (heaven forbid he cuts himself on the rims) I realized that I could actually put them to great use in the form of a nice little patriotic lantern string!! Here’s my step-by-step tutorial on how to make your very own tin can lanterns!!
STEP ONE – Get rid of the unsightly glue; rinse, clean, and dry!
This has to be the hardest part of the project! If you have any products for dissolving glue, I highly suggest using it!! I chose to soak the cans in a sink full of VERY HOT water, to melt the glue. Then, using a Brillo pad, scrub away any of the factory stamping (with expiration date, etc.) and any glue residue left. This was such a pain in the rear!! I think the Brillo actually made it harder to get the glue off, and I eventually ended up scratching it off with my fingernail. Clean them good (you don’t want the old food smell lingering at your 4th of July party) and make sure they are thoroughly dry.


STEP TWO – Drill the holes
Of course, you can’t have a lantern without holes to let the light shine through!! I’m sure there are easier ways to accomplish this - I’m thinking awl and hammer - however, despite my husband’s vast array of tools, we didn't seem to have one handy so I resorted to my trusty ‘ol drill! (Once you get the hang of it, this was so fast and efficient that I managed to drill all 6 cans in under a half hour! I will warn you though - your forearm will be very sore the next day!!)

There’s no rhyme or reason to the placement of the holes, so have at it!! I went all out crazy with holes on some, and uniformed on others. You can even created special “pictures” such as starts, flags, fireworks, or some other theme. Make sure you drill two holes at the top of the can so you can make a handle to hang them from.

I wanted to make this a no cost project (not including the fact that I already purchased what I had on hand, so that doesn't count) so I used paint that I've had for years now. I honestly think that spray paint would be a much better medium, but since I had latex paints, that’s what I used. Aluminum doesn't accept paint all that well so a few coats were in order. Here’s the first round:

I decided to sponge on the paint as it seemed to cover more efficiently plus I like the look of a more rustic texture. After two coats, I was ready to decorate. Now, I have to say I’m not the best freehand painter in the world, especially on a bumpy surface, so my designs look a bit like a child painted them. If you’re handy with a paint brush, I’m sure you’ll have a better outcome.
I had some acrylic sealer on hand as well, so I just gave the cans a once over to help protect them against the elements. I don’t plan on keeping them outdoors for an extended period, so I’m not so worried they will rust and flake. But, if they do, it may make for a really nice “vintage” look! We’ll have to see...

STEP FOUR – Make the hangers
You’ll need some form of pliable wire to make the can hangers. As long as it’s bendable, either by hand or pliers, this is easy. Just thread the wire through the holes that you drilled at the top, twist up the ends, and viola!


STEP FIVE – String ‘em up!
Find yourself a nice shady tree or other spot where you want to hand up your lanterns, and string ‘em together! Or, simply place them on your picnic table for some extra night time ambiance. They look so festive during the day, and magical at night!


A fairly simple project that anyone can make for any season. I think I will make some bright color lanterns for the summer and maybe some wintry designs for the coming Christmas season!
I hope you all decide to make your own lanterns and if you do, I'd love to see them! If you've already made some or plan to, make sure you come back and link up your lanterns in your comment!
Make sure you stop by and check out my other DIY Crafts:
 |
| Glass Stone Candle Jars |
 |
| DIY Easter Silhouettes |
Thanks for stopping in!

Find us liked up here:
Hope Studios - Tutorial Tuesdays
Kathe with an E - You're Gonna Love It
No Holding Back - Pin It Tuesday's
Powerful Mothering - Pin It Tuesday's
Big House Big Heart - Pin It Tuesday's
Coastal Charm - Nifty Thrifty Tuesday
Homework - The Creative Party
The Farmhouse Porch - The Scoop
Cedar Hill Ranch - The Scoop
Crafty Texas Girls - The Scoop
Fluster Buster - Fluster's Creative Muster
Rain on a Tin Roof - Fluster's Creative Muster
My Girlish Whims - Your Whims Wednesday
These are so cute and will be perfect for my sons birthday party! Pinned to my 4th of July Party board :-)
ReplyDeleteYay Jennifer!! If you do make them make sure you take pictures and come back and show us!!!
DeleteThese are such lovely & perfect for 4 July!
ReplyDeleteThanks for linking up with us. Have a good day :)
Thanks Areeba!!
DeleteThese are SO cute! Thanks for stopping by my blog from the hop! I'm following you back :)
ReplyDeleteThanks!! I really enjoyed making them too...I'm going to make a few for several different occasions!!
DeleteThey're so awesome , probably perfect choice to do on 4th of July . Lol , I never got how many teeth do dogs have . But they're sharp , I know.
ReplyDeleteNoor @ Noor's Place
lol Noor Yes, dogs teeth are sharp! I've been bitten a few too many times!! Thanks for dropping in!
Deletewhat a cute project - love this idea! and a great way to reuse something too. thanks for the follow from the blog hop - following back!
ReplyDelete-- jackie @ jade and oak
-- $75 anthropologie giveaway
I don't know what it is about that funny feeling you get when you reuse something!! I laugh at the cans every time I see them knowing they were once stinky dog food!! lol
DeleteJust found your blog!
ReplyDeleteNow following!
Looking forward to keeping up and getting to know you.
I also have a blog design site, if you ever need a blog makeover check it out :)
christinaloranedesigns.blogspot.com
xo
Christina
pieceitalltogetherx3.blogspot.com
Oh do I ever need a blog makeover Christina!! I will hit you up when I'm ready! Thanks for stopping in!!
DeleteI love this idea for a outdoor get together. I would love it if you would share it on our BBQ Block Party on Thursday
ReplyDeletehttp://easylifemealandpartyplanning.blogspot.com/
Hope to see you there.
Thanks for the invite Shawna!! I'm sorry I missed this week's, but I'll be over for next Thursday!
DeleteWow, I love this idea! So beautiful and crafty ;)
ReplyDeleteJamie @ Better With Age
Thank you!! I'm excited to try out some different "themes" but not sure my wrist is ready for that drill again!! haha
DeleteThese are great. You can do them for any occasion.
ReplyDeleteJulie
julieinthemaking.wordpress.com
I'm going to have to scour Pinterest for some more inspiration 'cause I'm itching to make more!!
DeleteLove these! Pinning this now. Thanks for linking up at Pin It Tuesday! ~ Pary Moppins
ReplyDeleteThanks for pinning and letting me link up!! I'll be back for more Pin it Tuesdays!!
DeleteWelcome to Fluster Buster's Creative Muster Party. I'm so happy that you stopped by and shared this wonderful 4th of July project. I hope you'll be joining us again.
ReplyDeleteRobin @ Fluster Buster
I'm glad that I found you!! I LOVE the party name so much!! It's so cute!! I'm sure to be back for more!
DeleteKate,
ReplyDeleteThese are sooooo darn cute and they will featured at NIFTY THRIFTY TUESDAY on Monday. Please feel free to grab my starfish featured button for your blog.
Blessings,
Linda
Linda!! Thank you so very much for the feature!!! I am so very sorry that I have been MIA for the last three weeks...have had QUITE a lot going on (a brief explanation on my post today, 7/15). I will most surely be over to grab that button and give you a HUGE thank you!!!! Thank you thank you thank you!!! lol
DeleteRespect and I have a keen proposal: What To Expect When Renovating A House dream house renovation
ReplyDeletetoongzhhi83cc
ReplyDeletegolden goose outlet
supreme outlet
golden goose outlet
golden goose outlet
golden goose outlet
golden goose outlet
golden goose outlet
golden goose outlet
golden goose outlet
golden goose outlet