I’m so excited to be a part of this awesome series presented by Sugar Bee Crafts!! There are so many fabulous projects that will be hosted here and I seriously urge you to check back daily (and catch up on already featured projects) to make sure you don’t miss out on the Patriotic posts that have been featured!


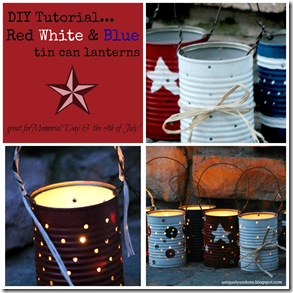
I've recently switched my dog over to a wet food diet since he had 22 teeth pulled (yes, 22! I never knew just how many teeth dogs do have!!) Since then, my recycling bins have become overflowing with cans - which my son then decides he can use them for his digging excursions. Being a bit wary of him using them (heaven forbid he cuts himself on the rims) I realized that I could actually put them to great use in the form of a nice little patriotic lantern string!! Here’s my step-by-step tutorial on how to make your very own tin can lanterns!!
STEP ONE – Get rid of the unsightly glue; rinse, clean, and dry!
This has to be the hardest part of the project! If you have any products for dissolving glue, I highly suggest using it!! I chose to soak the cans in a sink full of VERY HOT water, to melt the glue. Then, using a Brillo pad, scrub away any of the factory stamping (with expiration date, etc.) and any glue residue left. This was such a pain in the rear!! I think the Brillo actually made it harder to get the glue off, and I eventually ended up scratching it off with my fingernail. Clean them good (you don’t want the old food smell lingering at your 4th of July party) and make sure they are thoroughly dry.


STEP TWO – Drill the holes
Of course, you can’t have a lantern without holes to let the light shine through!! I’m sure there are easier ways to accomplish this - I’m thinking awl and hammer - however, despite my husband’s vast array of tools, we didn't seem to have one handy so I resorted to my trusty ‘ol drill! (Once you get the hang of it, this was so fast and efficient that I managed to drill all 6 cans in under a half hour! I will warn you though - your forearm will be very sore the next day!!)
 Making sure to steadily hold the can with one hand, decide where you want the holes placed, bring your bit to the can, apply pressure, and drill away!! CAUTION…the aftermath is a very, very, sharp can, so I highly recommend wearing gloves to avoid a cut. Aluminum cuts are the worst.
There’s no rhyme or reason to the placement of the holes, so have at it!! I went all out crazy with holes on some, and uniformed on others. You can even created special “pictures” such as starts, flags, fireworks, or some other theme. Make sure you drill two holes at the top of the can so you can make a handle to hang them from.

STEP THREE – Paint and seal
I wanted to make this a no cost project (not including the fact that I already purchased what I had on hand, so that doesn't count) so I used paint that I've had for years now. I honestly think that spray paint would be a much better medium, but since I had latex paints, that’s what I used. Aluminum doesn't accept paint all that well so a few coats were in order. Here’s the first round:

I decided to sponge on the paint as it seemed to cover more efficiently plus I like the look of a more rustic texture. After two coats, I was ready to decorate. Now, I have to say I’m not the best freehand painter in the world, especially on a bumpy surface, so my designs look a bit like a child painted them. If you’re handy with a paint brush, I’m sure you’ll have a better outcome.
I had some acrylic sealer on hand as well, so I just gave the cans a once over to help protect them against the elements. I don’t plan on keeping them outdoors for an extended period, so I’m not so worried they will rust and flake. But, if they do, it may make for a really nice “vintage” look! We’ll have to see...

STEP FOUR – Make the hangers
You’ll need some form of pliable wire to make the can hangers. As long as it’s bendable, either by hand or pliers, this is easy. Just thread the wire through the holes that you drilled at the top, twist up the ends, and viola!


STEP FIVE – String ‘em up!
Find yourself a nice shady tree or other spot where you want to hand up your lanterns, and string ‘em together! Or, simply place them on your picnic table for some extra night time ambiance. They look so festive during the day, and magical at night!


A fairly simple project that anyone can make for any season. I think I will make some bright color lanterns for the summer and maybe some wintry designs for the coming Christmas season!
I hope you all decide to make your own lanterns and if you do, I'd love to see them! If you've already made some or plan to, make sure you come back and link up your lanterns in your comment!
Make sure you stop by and check out my other DIY Crafts:
Thanks for stopping in!

Find us liked up here:
Hope Studios - Tutorial Tuesdays
Kathe with an E - You're Gonna Love It
No Holding Back - Pin It Tuesday's
Powerful Mothering - Pin It Tuesday's
Big House Big Heart - Pin It Tuesday's
Coastal Charm - Nifty Thrifty Tuesday
Homework - The Creative Party
The Farmhouse Porch - The Scoop
Cedar Hill Ranch - The Scoop
Crafty Texas Girls - The Scoop
Fluster Buster - Fluster's Creative Muster
Rain on a Tin Roof - Fluster's Creative Muster
My Girlish Whims - Your Whims Wednesday

I've recently switched my dog over to a wet food diet since he had 22 teeth pulled (yes, 22! I never knew just how many teeth dogs do have!!) Since then, my recycling bins have become overflowing with cans - which my son then decides he can use them for his digging excursions. Being a bit wary of him using them (heaven forbid he cuts himself on the rims) I realized that I could actually put them to great use in the form of a nice little patriotic lantern string!! Here’s my step-by-step tutorial on how to make your very own tin can lanterns!!
STEP ONE – Get rid of the unsightly glue; rinse, clean, and dry!
This has to be the hardest part of the project! If you have any products for dissolving glue, I highly suggest using it!! I chose to soak the cans in a sink full of VERY HOT water, to melt the glue. Then, using a Brillo pad, scrub away any of the factory stamping (with expiration date, etc.) and any glue residue left. This was such a pain in the rear!! I think the Brillo actually made it harder to get the glue off, and I eventually ended up scratching it off with my fingernail. Clean them good (you don’t want the old food smell lingering at your 4th of July party) and make sure they are thoroughly dry.

Notice how filthy the water gets from the Brillo? That was nothing compared to the permanent glue now left on my white sink! Ugh. I'm gonna have to write a post on how to get that junk off of a resin sink!

Drying nicely. Give it overnight if you can stand to wait that long!
STEP TWO – Drill the holes
Of course, you can’t have a lantern without holes to let the light shine through!! I’m sure there are easier ways to accomplish this - I’m thinking awl and hammer - however, despite my husband’s vast array of tools, we didn't seem to have one handy so I resorted to my trusty ‘ol drill! (Once you get the hang of it, this was so fast and efficient that I managed to drill all 6 cans in under a half hour! I will warn you though - your forearm will be very sore the next day!!)

There’s no rhyme or reason to the placement of the holes, so have at it!! I went all out crazy with holes on some, and uniformed on others. You can even created special “pictures” such as starts, flags, fireworks, or some other theme. Make sure you drill two holes at the top of the can so you can make a handle to hang them from.

I wanted to make this a no cost project (not including the fact that I already purchased what I had on hand, so that doesn't count) so I used paint that I've had for years now. I honestly think that spray paint would be a much better medium, but since I had latex paints, that’s what I used. Aluminum doesn't accept paint all that well so a few coats were in order. Here’s the first round:

I decided to sponge on the paint as it seemed to cover more efficiently plus I like the look of a more rustic texture. After two coats, I was ready to decorate. Now, I have to say I’m not the best freehand painter in the world, especially on a bumpy surface, so my designs look a bit like a child painted them. If you’re handy with a paint brush, I’m sure you’ll have a better outcome.
I had some acrylic sealer on hand as well, so I just gave the cans a once over to help protect them against the elements. I don’t plan on keeping them outdoors for an extended period, so I’m not so worried they will rust and flake. But, if they do, it may make for a really nice “vintage” look! We’ll have to see...

STEP FOUR – Make the hangers
You’ll need some form of pliable wire to make the can hangers. As long as it’s bendable, either by hand or pliers, this is easy. Just thread the wire through the holes that you drilled at the top, twist up the ends, and viola!

My wire happened to be rusty to start, which I love since it helps lend to the "rustic" feel. Again, I highly suggest gloves be worn during this part, since I ended up with some finger pricks!

All wired up and ready to hang!
STEP FIVE – String ‘em up!
Find yourself a nice shady tree or other spot where you want to hand up your lanterns, and string ‘em together! Or, simply place them on your picnic table for some extra night time ambiance. They look so festive during the day, and magical at night!


A fairly simple project that anyone can make for any season. I think I will make some bright color lanterns for the summer and maybe some wintry designs for the coming Christmas season!
I hope you all decide to make your own lanterns and if you do, I'd love to see them! If you've already made some or plan to, make sure you come back and link up your lanterns in your comment!
Make sure you stop by and check out my other DIY Crafts:
 |
| Glass Stone Candle Jars |
 |
| DIY Easter Silhouettes |
Thanks for stopping in!

Find us liked up here:
Hope Studios - Tutorial Tuesdays
Kathe with an E - You're Gonna Love It
No Holding Back - Pin It Tuesday's
Powerful Mothering - Pin It Tuesday's
Big House Big Heart - Pin It Tuesday's
Coastal Charm - Nifty Thrifty Tuesday
Homework - The Creative Party
The Farmhouse Porch - The Scoop
Cedar Hill Ranch - The Scoop
Crafty Texas Girls - The Scoop
Fluster Buster - Fluster's Creative Muster
Rain on a Tin Roof - Fluster's Creative Muster
My Girlish Whims - Your Whims Wednesday