My supply list:
- colored glass stones (one bag per candle jar)
- clear glass candle jar
- glue gun
- patience


I dumped out the stones and sorted them by color to make it easier to keep a pattern going.
 |
| Sorting made it easier to place the darkest blue pieces twice in one row since they were the least abundant! |
 |
| These weren't necessary to sort, since there were only three colors. |
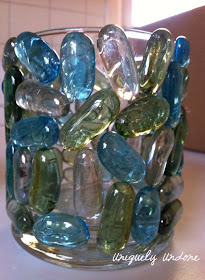
Then, I began gluing! The oblong stones were placed horizontally and vertically in whatever manner I could fit them!!


The round stones were easier to place in a row with two dark blue stones per row. There was a tight squeeze at the end of a row, and I had to overlap a stone...but on the finished product, you've never even know it wasn't a super snug fit!!
If you've ever worked with a glue gun before, you'll be well aware of the "stringage" you get!! These strings were easily pulled right off, so don't panic!!
Also, I came across a few misplaced stones, and was pleasantly surprised at how nicely the dried glue peeled right off of the stone.
And here are the finished products!! Cute as can be!!
Check out my other DIY crafts here!!
See this project at these link parties!
 |
 |
 |
|||
 |
|||||
|
|||||
| Making the World Cuter | |||||
 |
|||||
 |
|||||
|
|||||
 |


Looks so pretty with the candle light in them. This would be a great project for my Sunday School class (of high school girls). and it is the right price for me!
ReplyDeleteThanks Bobbie!! They really are easy to make...just a bit of patience when placing them so they align right, but only took about a half hour! And cheap!! $2 per candle holder!!!
DeleteVery pretty! Love how they look when they're lit! =)
ReplyDeleteThanks Ashley! I haven't tried them at night yet, but I can imagine they'd look even better!
DeleteVery cute idea. I have these stones (I think I bought them from IKEA several years ago). Now I know what I'm going to do with them. It will make for a fun kids craft too. Thanks for joining us at the Welcome To The Weekend Blog Hop. Following you.
ReplyDeleteThanks Nekky!! I appreciate the opportunity to link up!! And I'm glad I found you...LOVE your blog!!!
DeleteWe are having a blue and green mermaid party for my daughter in a couple of weeks and these would fit in perfectly:) Thanks for the idea!
ReplyDeletexxx
Kim
p.s. Ever think about turning off the comment moderation? Many people won't leave comments on blogs that use it, and I usually don't either. My eyes are bad and I end up entering it like 3 times...haha. You really will not get much crazy stuff on there- I get like 1 comment ever few months that I need to send to spam or delete. Just a thought:)
Thanks for the heads up Kim!!! I wondered why I had to publish them!!! Didn't realize I turned moderation on!!! lol
DeleteI hope you're able to make them for the party! They sound like the perfect fit!! Let me know if you do so I can come by and see the pics!!!!
These would be great on my dinning table when I host a dinner for my son's fiances family. I love the way they look with candles.
ReplyDeleteJenny @http://jennylynndesignz.blogspot.com/
Turned out really cute!
ReplyDeleteJenna @ http://rainonatinroof.com
Such a pretty craft - and lot's of bang for the buck! Using different colors would make the possibilities endless for the seasons. Hope you can stop by the enchanted oven for a visit.
ReplyDeletexo,
Lisa
Really pretty and looks so lovely when lit. Thanks for linking up to the Craftastic Party at Sew Can Do!
ReplyDeleteSuch a great idea. I never thought of that, so pretty!
ReplyDeleteTrying to catch up with Pink Saturday entries.
Hope you'd come and see my
PINK Mug and leave me some remark. Your comment is always appreciated.
These are fantastic! I love how they can be customized to go with any decor, and at such a reasonable price, too. Going to Pin this so I can give it a try myself.
ReplyDeleteAlso, I wanted to invite you to join my How To Tuesday link party, if you haven't already joined . It would be wonderful to have you!
http://housewifehowtos.com/linkage/link-party-2/how-to-tuesday-link-party-12-and-features/
I really like those voltive holders! Nice work. Thanks for sharing them at Monday Funday!
ReplyDeleteThank you for discussing this great topic.
ReplyDeletebest fragrance candles
fragrance candles
I did this with a large pickle jar and it turned out beautiful! The only difference is that I didn't use a hot glue gun, I used a permanent craft glue that dries clear that I bought in Michaels.
ReplyDeletelouis vuitton replica bags neverfull replica bags wholesale hong kong replica bags wholesale hong kong
ReplyDeleteWhere in the world did you find those jellybean shaped marbles? I've been searching all day.
ReplyDelete